This guide will teach you how to transfer files with rsync and scp commands. Both commands can be used to transfer single or multiple: files, and directories.
How to transfer files with Rsync and SCP
Before we start, it is important to know the main difference between each command.
Difference between Rysnc and SCP
The SCP command, in a short explanation, reads the file on the source, then writes the file over at the destination. Thus making this transaction a linear copy of the file(s) whether locally or over a network. Moreover, by default SCP is more secure because it uses the SSH protocol by default, meanwhile, rsync does not transfer the files via SSH, but it is possible to do so by using the -e flag.
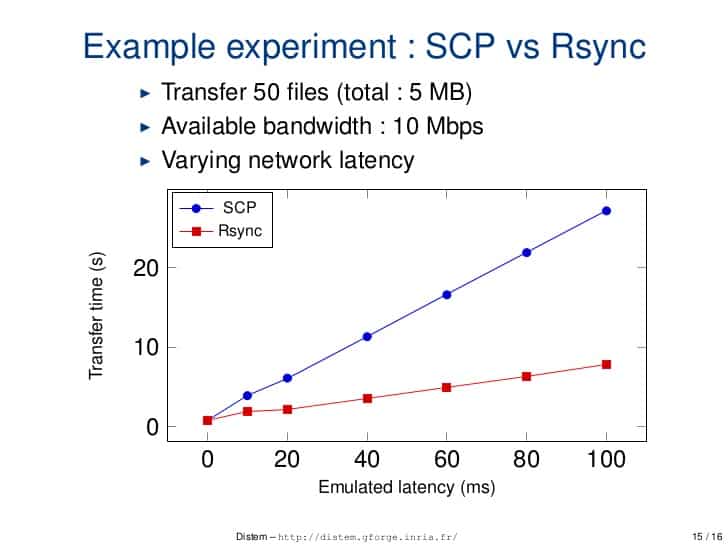
Similarly, the rsync command also copies files locally or over the network. Rsync shines because it uses the delta transfer algorithm, plus some optimizations that makes the transfer of the file or directory faster in comparison to SCP. Another advantage of rsync over SCP is that rsync is able to resume transfers if there is a loss of network, on the contrary SCP does not resume any file/directory transfer.

SCP Command Syntax
The syntax when using the SCP command is the following:
scp [OPTIONS] [user@]host1:]file [user@]host2:]file- OPTIONS: SCP has multiple options that you can specify when transferring, such as specifying the use of IPv4/IPv6, ciphers, compression etc.
- [user@]host1:]: This is the source of the file/directory on the device you’d like to transfer over to the second host
- [user@]host2:]: Destination
Some of the most used/common SCP options are:
-P: This specifies the port that SCP will use to make the connection to the destination (remote) host.-p: Preserves the access, modification, and modes from the file(s).-q: Quiet mode, this disables any progress bar or meter.-r: Recursive mode, copies entire directories. Do note that this will also copy any symlinks.-v: Verbose mode. It prints any progress.
Copying Files and Directories with SCP
It is important to understand that the SCP command will overwrite files/directories that have the same name on both systems, the local and destination, thus, make sure you pay attention to that.
Further, remember that SCP works with the SSH protocol, thus you need to know the password of the remote host or have setup an SSH key beforehand.
Locally
Copying files locally is extremely easy as we don’t have the need to connect over the internet to transfer any sort of files.
Files
In this case we will be transferring the linuxify.net text file over to the Demo directory:
scp source destinationscp linuxify.net Demo/Directories
For directories is basically the same, we have to specify the local directory and the destination.
SCP directory/ /home/user/Desktop/Over the network
In both cases it is basically the same syntax, just that in this case we need to specify the user and IP address of the remote server or host we want to transfer the file/directory over.
Files
SCP [options] files user@remote_host:/destination

SCP -rv file.txt [email protected]:/home/user/Desktop/
In the example above, the file.txt will get transferred over to the Desktop folder of the 192.168.0.120 host.
Directories
Similar to the local transfer of directories:
SCP [options] local-directory/ user@remote_host:/destination

SCP -rv Demo/ [email protected]:/home/user/Desktop/
This will copy recursively (-r option) the entire Demo folder from your system over to the specified host.
Transferring files and directories with Rsync
Rsync in a sense is similar to SCP and vice versa. Both have a lot of options or flags that can be used to specify a single or multiple things at once:
rsync [flags/options] local-files user@remote_host:/destinationIn comparison to SCP, rsync has a lot more options, here are the most used ones:
-V: Verbose mode. It outputs any progress.-r: Recursive mode. Copies all the files within a directory recursively.-a: Archive mode.-p: Preserves any permissions on the files or directories.- and a lot more . . .
Locally
Files
Since rsync is capable of transferring multiple files at once, we can specify all of them at the same time:
rsync file1.txt file2.txt /home/user/Desktop/Directories
Similarly to files, we have to specify the local directory and the destination:
rsync -apv directory /home/user/Desktop/Over the network
Similar to scp, the syntax is pretty much identical for both, files and directories
Files
rsync [options] source user@ip_destination_or_domain:/where/to/save/the/files/rsync -apv website-backup.zip [email protected]:/var/www/In this case, we are transferring the zip file over to the 127.0.0.10 server with the user called linuxify to the /var/www/ directory.
Directories
rsync [options] source user@ip_destination_or_domain:/where/to/save/the/files/rsync -apv htdocs/ [email protected]:/var/www/linuxify.net/htdocs/Simiarly, we are transferring the contents of the htdocs folder over to the 127.0.0.10 server using the linuxify user over to the /var/www/linuxify.net/htdocs/ directory.
Important: Be careful with the slash “/” at the end of the directory you would like to transfer. If you include a slash, you will only be transferring the contents of the directory. Meanwhile, if you do not include the slash at the end, you will be transferring the entire folder.
Summary
In this guide you learned how you can easily transfer files, and directories through the use of the scp, and rsync commands. Both commands are really useful when dealing with a lot of small files or even bigger files. You also learned the key differences between both commands.